Showing posts with label baking. Show all posts

Monday, December 14, 2009

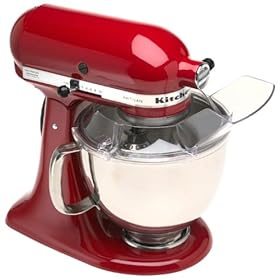
Meet My New Best Friend


I was able to get this baby on sale for only 101.91 plus tax!

How you ask me?

Well, Amazon had them on sale for $239.99, and then there is a rebate of $30. PLUS, when I cleaned out Barry's truck, I found a crap load of change. And I mean a lot. I took it to Coinstar where you can get free coin counting if you pick certain gift cards, and I picked an amazon one. With the change from his truck, I was able to get $108.08!!!! I also picked up a matching hand mixer in the same color for only $20. (not a KitchenAid, but the same red none the less).

I haven't used it yet, but I plan on it soon. I've been lusting after one of these for 10 years actually, and finally purchased one. I haven't had a new mixer in almost 5 years, so I am so excited to use this one.

I'll let you all know how it treats me!! I need to think up a good name for it. Any ideas?

Sunday, September 27, 2009

Banana Banana Bread

Can you believe I have never made banana bread before yesterday? In our 10 years of marriage, not once. I had a ton and a half of frozen, ripe, bananas in my freezer and decided to finally do something about it. I made it last night and we had it for breakfast this morning, with a cold glass of milk. It turned out great. We LOVED it. I bet you could make it even healthier using whole wheat flour, but I didn't have any on hand, so white it was. Maybe next time.

I saved some so the kids can have it as their snack tomorrow in school. Let's hope the teachers don't make a fuss about it, they're pretty crazy about "healthy" snacks. They're the snack Nazis to be completely honest.

Banana Banana Bread

Ingredients:

2 cups all purpose flour
1 tsp baking soda
1/4 tsp salt
1/2 cup butter
3/4 cup packed brown sugar
2 eggs, beaten
2 1/3 cups mashed overripe bananas

Directions:

Preheat your oven to 350 F (175 C).
Lightly grease a 9x5" loaf pan

In a large bowl, combine the flour, baking soda and salt.
In a separate bowl, cream butter and brown sugar.
Stir in eggs and mashed bananas until well blended.
Stir the two mixtures together, just to moisten.
Pour batter into prepared loaf pan.

Bake for 60-65 minutes until a toothpick comes out clean.
Let cool in a pan for 10 minutes, then turn out onto a wire rack.

*my oven cooks hot, so mine was done in about 55 minutes*
*Thanks to AllRecipes.com for this awesome recipe*

Wednesday, September 16, 2009

No Pudge Fudge Brownie Mix


Last month, I purchased the No Pudge Fudge Brownie Mix at my local Trader Joe's. I have been meaning to make it, but kept forgetting. Well, tonight I finally did after staring at it in the pantry for almost a month.

All you do is add one 6oz container of vanilla yogurt and mix. It's very easy, but very hard to stir, as it's quite thick. I had to use a really thick spatula to break up the powdered pieces and mix it in with the other moistened pieces. Definitely not as easy as regular brownie mix. Getting it into the baking pan was not an easy task as well, as the prepared mix is very sticky. I had to scrape the bowl and spatula each a few times to get all the brownie mix off.

The brownies tasted fantastic! I do recommend letting them cool completely, as they really are VERY fudgy. I will be buying these again. For anyone wondering, the ingredients are as follows:
  • Pure Cane Sugar
  • Unbleached Wheat Flour
  • Dutch Cocoa
  • Egg Whites
  • Cornstarch
  • Wheat Gluten
  • Salt
  • Baking Soda
I love, love, love the fact that they are all natural with no chemicals. To finish up, enjoy this picture of my yummy, fudgy, no pudge brownies:

Tuesday, September 08, 2009

Mish Mash

First off, thanks to Rina over at Gotta Little Space to Fill, for including my post "Biscuits, The Easy Way" in this week's edition of the Make it From Scratch Carnival. Maybe one day I'll get around to hosting, haha.

Secondly, tomorrow is the first day of school for us. Yaay!!! That means tonight I get to go to bed on time, wake up at the crack of dawn and go exercise. Oh joy! In all seriousness though, the kids are excited, and I am looking forward to getting some order back in our lives. Today we get to meet the Teachers and drop off our supplies. Last night at 10:15PM I realized I hadn't gotten the supplies together, so I was up till just after 11PM labelling boxes of crayons and sorting everything out. We're all ready to go now though.

Third, my intention to do the Holiday Grand Plan went to shit last week due to my husband being home. I might have to skip this week as well, or at least not post about it. I'm trying people...trying, haha. Maybe I can do the Week 2 post tomorrow.

And finally, I ate at Cold Stone Creamery for the first time a week and a half ago. I don't know what I was missing. It was the best ice cream ever! I had the Apple Pie A La Cold Stone, which was divine. I attempted to re-create it the other night. I think I did a pretty good job, but I will try some different brands next time as I didn't like the flavor one of them gave me.

Here it is, my delectable version of Cold Stone's Apple Pie ice cream:

Apple Pie A La Joanna

Ingredients:
Several scoops of vanilla bean ice cream
1/3- 1/2 cup of graham cracker pie crust pieces
Apple pie filling apples (as many as you want)
Cinnamon to taste
Caramel sauce

Mix everything in a bowl and dig in.
You can use as much or as little of the ingredients as you want.
That's it.

Friday, August 28, 2009

Biscuity Goodness, A Picture

I made them again this morning, so here is a picture of my handiwork. They were all demolished again. I'm satisfied and pleased that it went over so well.

You'll see the little twisty one to the left: When I no longer have extra dough to make a whole biscuit, I twist it up and let the kids fight over it. They always want the oddly shaped one. My husband tells me his mom did some version of this as they were growing up too.


Thursday, August 27, 2009

Biscuits, The Easy Way

Today I made biscuits for the first time, and I was amazed how easy it was. My husband is a big fan of hot breakfasts for everyone, so I made these for us this morning.

Biscuit Recipe

2 cups self-rising flour
1/4 cup All-Vegetable Shortening
1 cup buttermilk, or you can use whole milk


Preheat oven to 500 degrees F.

In a mixing bowl, cut the shortening into the Self-Rising Flour with a pastry blender or fork or your fingertips until it resembles coarse crumbs. I usually use two knives, as I don't have a pastry blender.

Blend in milk with fork just until the dough comes together. The dough will be sticky.

Turn the dough onto a lightly floured surface. Knead gently by folding the dough 8 to 10 times.

Roll it out with a rolling pin till it is about 1 inch thick.

Cut out biscuits with a 2-inch cutter, being sure to push straight down through the dough.
Do not twist the cutter until the dough has been cut all the way through (twisting the cutter will cause the biscuits not to rise straight up. This is very important, don't skip it.

Place the biscuits on baking sheet so that they barely touch. Gather up the scrap dough, press it into a circle, working it as little as possible and continue cutting until all dough has been used.

Bake 8 to 10 minutes or until golden brown.


Serve warm with butter, or homemade strawberry jam as I did.

The kids devoured these. I made a double batch, and we had non left. My son ate 5! All I heard all breakfast was "These are so good Mom!", "These are delicious!", "That was fantastic Honey", etc etc. Not to toot my own horn, but they were quite tasty.

I've never made them before, so it was good for me to get out of my comfort zone. I'll be making these again for sure.

Tuesday, August 25, 2009

Tempt My Tummy Tuesday


I have to repost this recipe, as it has become a family favorite. I have about 4 loaves of it in the freezer, and we're just dying to eat it. My husband is coming home tomorrow, so I suspect we'll be having some for desert, or a snack, really soon.
I even froze some blueberries with a plan to make this once our other loaves run out. I specifically labeled the freezer bags "Blueberry Buckle", so we wouldn't eat the frozen berries inside, haha.


Blueberry Buckle

Cake batter:

  • 3/4 cup sugar

  • 1/4 cup soft butter
  • 1 egg
  • 1/2 cups milk
  • 2 cups flour all-purpose
  • 2 and 1/2 teaspoons baking powder
  • 1/2 teaspoon salt (optional)
  • 2 and 1/4 cups fresh blueberries
  • 1/2 teaspoon cinnamon


Step 1 - Wash the blueberries

Just rinse them in a colander or sieve in cold water, no soap.
Now is also a good time to get the oven preheating to 375 F.
Step 2 - Mix the dry ingredients
Combine the 3/4 cup sugar, 2 and 1/2 teaspoons baking powder, 1/2 teaspoon salt (optional) and 1/2 teaspoon cinnamon in a bowl and mix well!

Step 3 - Add the butter and the egg

Add the 1/4 cup soft butter, the egg and using a mixer (hand, electric, or just a large spoon, whatever you have) , mix it up!
Step 4 - Mix in the milk
Add the 1/2 cups milk and mix it up.

Step 5 - Add the flour

While mixing, stir in the 2 cups of flour! (it's just like making pancakes). It will end up like very thick pancake batter. You may have to finish mixing by hand . I added a splash of extra milk here, the batter was much too thick.

Step 6 - Add the blueberries and mix

Add the blueberries and gently mix it. You don't want to crush the berries, but it won't matter if some get crushed, either!

Step 7 - Grease and flour the pan(s)
This is pretty self explanatory

Step 8 - Pour the batter into the pan(s)

Just pour the batter into the the pans. It should only fill the pan about half way up! It WILL rise, don't worry!

Step 9 - Make the topping

Now to make the topping, in another bowl, mix together the topping ingredients:
  • 3/4 cup sugar
  • 1/2 cup flour
  • 1/2 teaspoon cinnamon
  • 1/4 cup soft or melted butter or margarine

Step 10 - Sprinkle the crumb topping over the batter

Pretty self-explanatory, don't you think?

Step 11 - Put the coffee cake in the oven!

Cook the coffee cake at 375 F (or 190 Celsius) for 45 minutes.

Step 12 - Remove when the coffee cake is golden brown

After about 35 minutes, check to see if the top is golden brown. If if not, check every 3 or 4 minutes until it is

Enjoy!


Thursday, August 20, 2009

Check Out My Clubs

I apologize for not having posted since last Saturday. Life just kind of got away from me, I had a bit of writer's block, and we were pretty busy. I'm back in the game now though.

Check out these babies! My husband calls them clubs because they could be weapons of mass destruction. When my 3 year old saw them she said with wonder in her voice, "Mommy, look at the giant pickle!"


Thanks to my friend Sara, I was gifted with these two huge Zucchinis to do with as I pleased. They're each a respectable 22 inches long! I plan to grate most of them and freeze it for future use in sauces, baking and what not.

What do you do with your Zucchini?

Thursday, August 13, 2009

Eatmore Bars

If you're Canadian, you know what Eatmore candy bars are. They're a delicious, chocolaty, chewy snack. Since I don't live in Canada anymore, I just make my own from a recipe my Mom gave me. She made these for us when we were growing up, and they taste much, much better than the store bought ones I think.


Eatmore Bars

Ingredients:

1 cup smooth peanut butter
3/4 cup honey
1 tsp vanilla
1 1/2 cup old fashioned oats
1 cup chocolate chips
1 cup salted peanuts
1 cup raisins

Directions:

Combine the peanut butter and honey in a large saucepan.
Cook over medium heat, stirring constantly until just boiling.
Remove from the heat, and add vanilla, oatmeal, chocolate chips, peanuts and raisins.
Stir all ingredients together until all the chocolate is melted and the mix is well combined.

Put into a greased 9x9 inch baking pan. Chill for 1 hour!

Makes 24 bars. Enjoy!

I'll be making these for the kids for an after school snack once they go back to school. They're "forbidden" at school, so they'll only be eaten at home. Look for some more back to school snacks and recipes here, I'll be posting some more real soon.

Thursday, August 06, 2009

Blueberry Pie With Crumb Topping

Today was a bit of a disaster. So many things went wrong, but at least the pie was good, right? One of the pies I made to freeze, somehow got tilted in the freezer and leaked the juice everywhere, so I cooked it for us for dessert. It was quite tasty! Due to this little problem though, I am now short blueberries, so the kids and I are going to go to the blueberry farm tomorrow and pick a couple more baskets worth to make up for the lost berries. I think we ate a few too many, oops!


Blueberry Pie

Pie Ingredients:

3-4 cups of Blueberries (4 if you want a nice, thick pie)
7 tbsp cornstarch
3 tbsp water
2 tbsp lemon juice
1 9 inch pie crust
1 tsp cinnamon
2/3 cup sugar
nutmeg to taste (go sparingly with nutmeg)

Crumb Topping Ingredients:
1/4 cup sugar
1/2 cup flour
1/4 cup softened butter

Pre-heat your oven to 375*F
Combine the dry pie ingredients in a bowl and mix well.
Mix in the liquids and stir it up.

Pour the blueberries into the crust. Just pour them in! There's lots of air space and it will cook down, so don't worry if they mound up about an inch above the plate.

Pour the liquid mix all over the blueberries, giving it a good coating.

Now it's time to make your coating. In a bowl, mix the flour, butter and sugar. The recipe doesn't call for cinnamon, but I add about 1 tbsp worth because we like cinnamon. Take two butter knives and cut the butter into the flour and sugar until the butter is in small chunks and everything is mixed well. If you've never made a crumb topping before, it is very easy. Just hold one knife in each hand and cut the ingredients. They will mix by themselves as you "cut" them.

Place the pie onto a cookie sheet, and bake for 375 for about 45 minutes.

Enjoy!!!


Wednesday, August 05, 2009

Berries, Berries, and More Berries

Wasn't it Tigger that said "Berries, berries and more berries"? I seem to recall that line from a favorite Winnie The Pooh movie, Seasons of Giving, that my kids watch often.

Today we went Blueberry picking. When we pick, boy do we pick. The kids and I came home with almost 20lbs of Blueberries!!! I have 4 large pails full and the kids are inhaling them. How can a mom say no to them eating an abundance of Super food?

This afternoon I tackled bucket #1. With it, I froze 9 cups of blueberries, and made 3 Blueberry Buckles. They are cooking right now and the kitchen smells to die for! I did pick too many, so I have offered some to a friend who is gifting me with a 3 foot long monster Zucchini. Don't ask me what I'm doing with that yet, I have to mentally prepare for it.


Blueberry Buckle

Cake batter:
  • 3/4 cup sugar

  • 1/4 cup soft butter
  • 1 egg
  • 1/2 cups milk
  • 2 cups flour all-purpose
  • 2 and 1/2 teaspoons baking powder
  • 1/2 teaspoon salt (optional)
  • 2 and 1/4 cups fresh blueberries
  • 1/2 teaspoon cinnamon

Step 1 - Wash the blueberries

Just rinse them in a colander or sieve in cold water, no soap.

Now is also a good time to get the oven preheating to 375 F.

Step 2 - Mix the dry ingredients

Combine the 3/4 cup sugar, 2 and 1/2 teaspoons baking powder, 1/2 teaspoon salt (optional) and 1/2 teaspoon cinnamon in a bowl and mix well!

Step 3 - Add the butter and the egg

Add the 1/4 cup soft butter, the egg and using a mixer (hand, electric, or just a large spoon, whatever you have) , mix it up!

Step 4 - Mix in the milk

Add the 1/2 cups milk and mix it up.

Step 5 - Add the flour

While mixing, stir in the 2 cups of flour! (it's just like making pancakes). It will end up like very thick pancake batter. You may have to finish mixing by hand . I added a splash of extra milk here, the batter was much too thick.

Step 6 - Add the blueberries and mix

Add the blueberries and gently mix it. You don't want to crush the berries, but it won't matter if some get crushed, either!

Step 7 - Grease and flour the pan(s)

This is pretty self explanatory

Step 8 - Pour the batter into the pan(s)

Just pour the batter into the the pans. It should only fill the pan about half way up! It WILL rise, don't worry!

Step 9 - Make the topping

Now to make the topping, in another bowl, mix together the topping ingredients:

  • 3/4 cup sugar
  • 1/2 cup flour
  • 1/2 teaspoon cinnamon
  • 1/4 cup soft or melted butter or margarine

Step 10 - Sprinkle the crumb topping over the batter

Pretty self-explanatory, don't you think?

Step 11 - Put the coffee cake in the oven!

Cook the coffee cake at 375 F (or 190 Celsius) for 45 minutes.

Step 12 - Remove when the coffee cake is golden brown

After about 35 minutes, check to see if the top is golden brown. If if not, check every 3 or 4 minutes until it is

Enjoy!


Friday, June 26, 2009

Hot Dog Roll-Ups

12 Years ago I had my first ever Hot Dog Roll-Up. I had never had them before, but my summer working at Keats Camp enlightened me to the wonderful taste that is a Hot Dog Roll-Up.

OK really, I don't love them anymore, they are OK to eat, but the kids love them. I almost never make them though, but since I was so busy making jam today, I needed something easy to make for dinner. Anyone can make these, and I bet most of you have for your kids one time or another.


Hot Dog Roll-Ups

Ingredients:

2 pack crescent rolls
8 pack of hot dogs
4 slices of "sandwich cheese" aka processed cheese wrapped in plastic

Pre-heat your oven to 375F

Unroll your crescent rolls and place a half slice of cheese on each one.
Place the hot dog at the wide end of the crescent roll, and wrap it around the hot dog.

Bake for 9-11 minutes. (mine took 7.5 minutes)

I served them to the kids with a dollop (LOVE that word) of ketchup. A quick, and easy dinner. Not one I will make all the time, but something you can make when you're in a pinch.

Tuesday, June 23, 2009

Chocolate Buttercream Frosting

Our oldest daughter has been bugging us about learning to cook, so we made cupcakes this afternoon. I used up a Golden Butter Cake mix I had in the house, but wanted to make my own frosting because I don't like "canned" frosting. Thanks to Allrecipes.com for this recipe!


Ingredients

1/4 cup softened butter
2 cups confectioners' sugar
3 tbsp cocoa powder
1 tsp vanilla extract
2 tbsp milk

Mix together all ingredients. You may need to add more milk, slowly, until frosting reaches a spreading consistency. Spread the frosting on the cookies or cupcakes of your choice!

Frosts 24 cupcakes

*I used 5 tbsp of cocoa powder because 3 just didn't give enough of a chocolate taste. I also had to add about 1tbsp of milk throughout the mixing to give it the right consistency.

What I really liked about this recipe is that the frosting is *just right*. It had a perfect light, fluffy texture, with just a hint of chocolate flavor. It was very easy to spread as well. And the bonus for me was that it didn't have that canned chemical taste that regular canned frosting does. The frosting does harden up slightly, so make sure you add any decorations before you set it aside. I did want to pipe the frosting on, but I forgot to double the recipe beforehand. If you piped with this amount of frosting, you wouldn't be able to frost as many cupcakes.

This is definitely on my "make again" list. I won't be buying canned frosting again.

Sunday, April 12, 2009

An Iron Chef, I am not

But I sure can make some good dinosaur eggs!

I have just not had much luck in the kitchen lately. Frankly, I've been sucking ass! Last week it was the Three Cheese Baked Ziti (because my cheese had mold! grr!), and then today my Pea Soup just crapped out on me. I didn't do anything wrong either, but my peas decided to be extra liquidey, so we have Pea soup broth and ham. Not a nice tasty, chunky pea soup. *sigh*

The only thing that did work out well was the homemade Easter eggs I made with the kids. Originally I was going to make homemade Marshmallow eggs, but decided to make homemade Fondant eggs instead. They turned out ok, but if I could change anything, I would use a different extract for flavor, and not just plain vanilla.

I got the recipe for them on the "Baking" page of About.com. The kids and I tinted them green as follows, and then dipped them in chocolate. The chocolate pictures didn't turn out, so I'm sorry I can't show you what they looked like. I put the recipe at the bottom of the post.


And after we "shaped" them


As you can see, the kids and I have no concept as to what eggs look like! lol

I left them in the fridge overnight to firm up really well, and then this afternoon, we dipped them. I took about 1lb of melting chocolate, and one by one, gently dipped the bottom of each egg in the chocolate to coat it. Then we placed it on a cooling rack so the excess chocolate could drip off (the cooling rack was resting above a cookie sheet covered in wax paper). Then I took about a tablespoon of melted chocolate and spread/dripped it over each egg to cover the top.

The eggs looked really neat, and the kids loved them!


Ok, so I found ONE passable picture of the chocolate covered dinosaur eggs. If you want, you can decorate the tops with some melted, colored, chocolate as well. I didn't bother trying, because I didn't want to push my luck. Like I said above, I would use a different extract for flavor. I think if I make them again, orange would be a good one to try. Today I used vanilla, and I just wasn't very impressed with it. But at least the kids liked it, right?

Oh, and my tip to getting those eggs nice and green? It's my secret weapon: Wilton Leaf Green icing color. We don't use anything but Wilton gel food coloring now, nothing beats it.


Fondant Easter Eggs


Ingredients:

* 1/2 cup butter, softened
* 1 teaspoon salt
* 14 ounce can sweetened condensed milk
* 2 pounds plus 2 cups powdered sugar
* assorted food flavorings (vanilla, almond, lemon, maple or peppermint extract)
* 1 pound chocolate and/or vanilla-flavored candy coating
* several different tubes of decorator frosting

Preparation:
In a large bowl, beat margarine and salt until fluffy; gradually beat in sweetened condensed milk, then 2 pounds powdered sugar until well blended. Divide into 4 equal portions. In medium bowls, tint each portion with a few drops food coloring; flavor each portion with 1/2 teaspoon desired flavoring. On a smooth surface, knead 1/4 to 1/2 cup powdered sugar into each portion until smooth. Shape into 4 or 6 eggs. Place on baking sheets; cover and chill until firm, about 4 hours or overnight. Insert a 2-pronged fork into the bottom of each chilled egg. Dip into warm candy coating; let excess coating drip off. Place on waxed paper lined baking sheets; let stand or chill until firm. Decorate as desired with frosting. Store covered at room temperature or in the refrigerator. If using vanilla flavored candy coating, you may need to dip twice.

*I only used half a pound of chocolate because I tossed half the dough. I didn't have the patience to do the whole recipe"


I just wanted to add: our pea soup thickened up quite nicely. Not as thick as I would have liked, but it was still delicious! I bet it will be perfect for lunch tomorrow!

Thursday, February 12, 2009

Amish Bread, Day Two

Yesterday I made Homemade Amish Bread, but didn't have the greatest results. It was good, but very heavy and dense.

Today I tried again. I haven't had the opportunity to taste it, as it is going out with my husband. I might make the kids and I a loaf tomorrow.

What I did differently today was to first use 1/2 cup less flour, and 1/8 tsp more yeast. So I did 1 1/4 teaspoons of yeast instead of 1 1/8th. I also made sure the water was a lot hotter when I was disolving the yeast. And lastly, I made sure that the bread was in an even warmer spot than yesterday. Luckily I was baking cookies today (another post to come about that later), so the oven was on and the bread rose nicely. Twice.

Here is a picture of the bread right before I put it in the oven:

Photobucket

And here is one of it after baking. I also brushed butter on the top to soften it.

Photobucket

Please pardon the fuzziness, my camera battery is dying.

I'm guessing the final verdict will be tomorrow when my husband tells me if it was good or not!

****

2/15 I forgot to update. He said the bread was much much better! Still a little dense, but not nearly as bad as last time, LOL. As you can see the bread turned out beatifully as well, but I guess it "kneads" a bit more "kneading", lol.

Wednesday, February 11, 2009

Homemade Amish Bread

Since my last post about making bread, Not To Toot My Own Horn, I have been much too scared to even try making my own bread again. My confidence from last time completely vanished. I haven't found anyone to fix my bread machine, so the general consensus in our home is to just toss it. I'm sad though, because it has been a faithful friend in my kitchen for the last two years. Ok, not really sad, but you know what I mean, right? Now I get the pleasure of spending $100 on a new one next weekend once our tax return comes. I'd still rather keep my old one if it were working.

My dear husband has been patient with store bought french bread from Safeway, but today he asked me to try make some from scratch again. I did try everything to get out of it, even offer to go to Safeway and pick some up, but he wouldn't have it.

So out came the Amish cookbook that I have, and I found a recipe for Homemade Bread, as follows. However, I will make a few suggestions; if you halve the recipe like I did, only add 3.5 cups of flour, not 4. With 4 you are going to have to add more water as you knead it because it gets too try to do anything with. The original recipe yields TWO two lb loaves of bread.

Homemade Bread

1 (1/4 ounce) package active dry yeast (for one loaf of bread I used 1 1/8th tsp)
1/2 cup plus 2 cups warm water or milk
1 heaping tablespoon lard or shortening
1 tablespoons sugar
1 tablespoon salt
7-8 cups all purpose flour (I used Gold Medal "Better For Bread Flour)

In a small bowl, dissolve the yeast in the 1/2 cup warm water.

In a large mixing bowl, combine the lard, sugar, salt and the remaining 2 cups water. Into the mixing bowl, stir the yeast, and enough of the flour to make a soft, elastic dough that doesn't stick o the sides of the bowl. Knead well with your hands.

Cover the dough with a loose piece of cheesecloth or plastic wrap and let rise till double (about 1 1/4 hours) in a warm, draft-free place, such as a table close to the stove or a sunny windowsill.

Punch the dough down, and divide it into 2 balls. Form 2 loaves with your hands. Put the loaves in greased loaf pans. Cover with a damp cloth and let rise again until double (45 to 60 minutes). Bake in a 325F oven for about 45 minutes. The bread will sound hollow when it's done. After removing the bread from the oven, brush the top with butter. This will make for a softer crust.

I took this recipe from "The Amish Cook", written by Elizabeth Coblentz


Right now my loaf is in the first rising stage. I have the timer set and it should be done in about 45 minutes. I will update later!

******

Well, some people are very impatient. I happened to be away at a Valentine's day performance for my middle daughter, which is why I didn't post earlier.

So, the verdict is in. The bread was very good, but VERY dense. It definitely needed to rise longer, and it definitely needs 3.5 cups flour, not 4 cups. I'm making another loaf tomorrow, so hopefully it will turn out better. Oh, and a pinch more salt is good too. It definitely tasted a bit bland.

Sunday, December 21, 2008

Rachel Ray's Fudge Wreath


I made this today with the kids. The "garnish" is just cut up "dots" candies. I think that the butterscotch chips add just a bit too much sweetness, so I will do it with plain chocolate chips next time, and also add some more walnuts. I did not use the currants either. Other than that, it turned out great! I'm pretty happy with it.

**I wanted to also let you all know, we're expecting a HUGE storm to come through here tonight and tomorrow, so if I lose power, I will be back as soon as I can**


Ingredients

* 1 (12-ounce) bag semisweet chocolate morsels
* 9 ounces (3/4 of a 12-ounce bag) butterscotch morsels
* 1 (14-ounce) can sweetened condensed milk
* 1 teaspoon vanilla extract
* 1 (8-ounce) can walnut halves
* 1/2 cup (a couple of handfuls) currants
* 8-inch cake pan, lightly greased with softened butter
* Candied cherries, red and green, for garnish, optional

Directions

Place a heavy pot on the stove and preheat it over low heat. Add chips and milk and stir until chips are melted and milk combined. Save the empty condensed milk can. Stir in vanilla and remove fudge from heat. Add nuts and currants and stir in immediately.

Cover empty condensed milk can with plastic food wrap and center it in the greased cake pan. Spoon fudge into pan around can, making sure to recenter can if it drifts.

The fudge will set up almost immediately. Garnish can only be added in the first minute or 2 the fudge is in the pan, so work quickly. Decorate your wreath with "holly" made from cut candied red and green cherries. A wreath left plain can be garnished with a pretty fabric bow when serving. Chill covered in the refrigerator and slice fudge very thin when ready to serve, a little goes a long way.

Friday, December 12, 2008

My Christmas Baking List

I mentioned yesterday that I had done a huge grocery shopping trip earlier this week. When I planned out my groceries, I also carefully went through my pantry and recipe books to decide what kind of cookies and treats I would be making this year. I am pretty sure I bought enough ingredients, but if not, I can always buy extras.

Here is my list for this year:

No Bakes (The Man's favorite)
M&M cookies (I'll be doing it with just chocolate chips this time)
Gingerbread men- from scratch, not a bag mix
Shortbread
Peanut Butter Fudge (my favorite!!!)
Chocolate Fudge with Walnuts or Rocky Road fudge with marshmallows-haven't quite decided
Oreo Truffles - Kids' favorite
Buckeyes
Pumpkin Roll

Possibility:

Thumbprint
Peanut Butter Balls

Now since I don't have the luxury of a large freezer, all of this will be done over several days. Most of them I will only do one batch of, like the gingerbread, because the kids like to decorate them and we always have more than enough. The Buckeyes make a huge batch, probably 5 dozen, so there is no need for doubling. I always always double the no bakes and chocolate chip cookies because my husband loves those.

We'll start our baking probably the 21st or 22nd I think. And this weekend the kids and I are putting up the gingerbread houses!!!

Thursday, December 11, 2008

I Guess It's Time

I think I've done enough hiding away for now. I haven't really been inspired, but I just need to do it now. I don't want all my readers to run away!!

The last couple weeks have been really busy for our family. We had Thanksgiving, and then the following weekend, my mom and sister came to visit. Plus, we've had a few days off from school, a Choir concert, Karate Lessons, MOPS and other general stuff that keeps a family busy.

The other day I made my grocery list for the next 2.5 weeks or so, and spent waaaay too much money. It was necessary though, as we needed a lot of extras for Christmas baking and stockings and what not. Plus, we also needed expensive items like laundry soap, cat litter, beef etc. But I am all done, and just need to purchase our Christmas dinner stuff yet (we still haven't decided what to eat!!!!), and a few extras for our gingerbread house and stockings that I couldn't find at wal mart earlier this week.

The Gingerbread house will be decorated this weekend! I am looking forward to it, we always have so much fun doing it. I will have to do a special post about that and show off some pictures. Tomorrow night we're going to a Family craft night at our YMCA. They are starting this and doing it once a month for Full members,and you can go in for 1.5 hours and do all kinds of seasonally appropriate crafts. So this time we're doing Christmas crafts. The kids are really quite excited about it, I think it will be a lot of fun.

Next week also starts the last week of school before Christmas Vacation!!!! The kids' last day is December 19th, so only 6 full days of school left. My husband is coming home on the 24th, Christmas Eve, so we'll have lots do do before he comes home. I will be doing all my baking after the kids' break starts, because I don't have a lot of freezer room and I want the cookies to stay fresh. I'll really have to pack that fridge and freezer, and I am a little worried about it actually. Hmmm...perhaps I can make the dough ahead of time and then bake it closer to Christmas? I'll have to see.

Anyway, I'm running out of steam already, lol. Bare with me as I try to get back into the swing of things...

Merry Christmas!!!

Sunday, November 30, 2008

An Oldie But A Goody

I am sure that everyone and their dog has made "Muddy Buddies" or "Puppy Chow", but I'll share the recipe anyway! I made it for the kids this afternoon. I had planned on making some cookies for school snacks, but I realized I only had enough eggs for my meatloaf for dinner.

Chex Muddy Buddies

9 cups Rice Chex, or "Shreddies" if you live in Canada
1 cup semisweet chocolate chips
1/2 cup PB
1/4 cup butter
1 tsp vanilla
1.5 cups icing sugar or "powdered sugar" if you live in the USA

In a large bowl, place the cereal

In another bowl, mix the chocolate chips, butter and PB and microwave for 1 minute on high or until the mix is smooth when you stir it. Stir in the vanilla when it is smooth. Pour the mix over the cereal in the bowl and stir till well coated. Pour into a large, preferably 2 gallon, ziplock bag. I only had 1 gallon on hand, but it worked fine.

Add the icing sugar and shake, shake, shake, till all the cereal is coated. You can leave it in the bowl to cool, or you can spread it on wax paper to cool as well. Store in an airtight container in the fridge.

It is an easy, quick snack, but man does it give you a rush! I had a small bowl, maybe a cup worth, and I have a headache already!
Powered By Blogger